Generate data samples from your production database (with sensitive information removed) you can use to replace your seed/test data and can install locally to recreate reported product bugs.
This guide outlines how to use Redactics to generate production data samples useful for testing purposes with the following features/characteristics:
- Automatic replenishing of new production data within your test database by way of the “Digital Twin Data Feed” feature, which creates a working clone of your production data minus sensitive information (including PII).
- Option to delta update your digital twin with new data so that performance approaches real-time, allowing you to schedule updates every few minutes or so.
- With the delta update option enabled you are free to add new data to your test database or overwrite existing data without this data being reset, or without having to worry about your new data creating primary key conflicts as new data is replicated from your production database.
- Sensitive information/PII handling (with a supplementary and optional PII data scanner tool for identifying PII you might have missed based on HIPAA identifiers).
- Email address PII handling ruleset to replace original email addresses with unique fake email addresses to ensure that your testing does not trigger emails to your customers.
- Data samples based on a time period, so that if your use case is focused around reproducing errors that involve data being in a certain state (or building ephemeral environments), your workflows are not bogged down by recreating ancient and/or irrelevant data.
- Support to exclude tables which provide no value to your use case.
- Support to archive/version datasets in a data repository that can be used like you would version code in Github, or to feed your CI/CD pipelines with these data samples for automated testing.
- Support to install these same datasets locally to replace your seed data and/or recreate a production bug.
- Support to aggregate data from multiple input data sources within a single workflow.
Step 1: Create Your Redactics Account
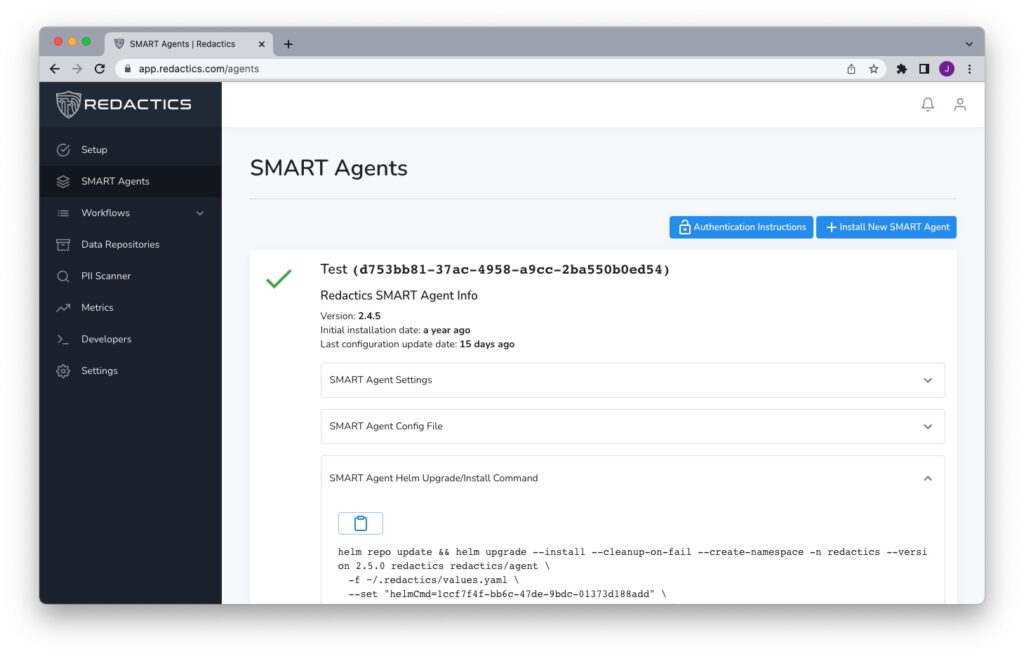
Have your engineer create your company’s Redactics account (or create it yourself and invite them to it). They will need to also create their first Redactics SMART Agent and workflow. Don’t worry about configuring the workflow for right now, the engineer simply needs to follow the instructions to install the SMART Agent with an empty workflow of type ERL (Extract, Redact, Load). You can give this workflow any name you like, e.g. “Test Environment”. They’ll also need to define the master database by clicking on “Add Database” in the “Input Settings” section. This will also require listing all of the tables you intend to use within this workflow (and don’t worry, if you need to change these you can always come back later). Note that if you intend to use your new database with your application code you’ll need to include tables that belong to dependent table relationships so that these relationships will not break. For example, a lot of tables typically relate to users or companies, so you’ll need to include these for your application to not trigger exceptions. Once the SMART Agent has been installed it will report back to the Redactics Dashboard, and you’ll see a green checkmark in the SMART Agent section:

With this step complete, once you have established a working workflow and decide to update it later, the SMART Agent will automatically recognize these changes without a re-installation being required.
Step 2: Configure Your Redactics Workflow
Return to your workflow configuration, your Input Settings should already be completed, but if you wish to aggregate data from multiple input sources you can define additional databases here. Some notes on this:
- The SMART Agent requires network access for each database it interacts with.
- Please let us know if you require support for input sources other than the available options. These could include non-databases such as data from cloud-hosted buckets, APIs, etc. It is not difficult for us to add support for additional input sources, we are prioritizing these based on customer feedback!
Once you’ve defined all of your input sources, proceed to do the following:
- In “Processing/Transformation Settings” define all of your tables and fields containing sensitive information, and select an appropriate ruleset for handling this. We strongly suggest redaction rules for all email addresses, even if this information is not considered sensitive, so that during your testing you do not accidentally trigger emails to your users. The same is true of any other forms of keys that are used for sending notifications (including device notifications). You can, of course, disable notifications in your code, but it never hurts to blackhole these alerts.
- If you are unsure that you’ve identified all of your PII, your engineer can install the SMART Agent CLI and kick off an automated scan using the PII Scanner tool. Results will be reported back to the “PII Scanner” section of the Dashboard where you can automate creating additional redaction rules to your configuration for these new fields.
- In the “Workflow Schedule Options” you can decide to put your workflow on a schedule. Please note that these times are in the UTC timezone (also known as Greenwich Mean Time or GMT), and custom times are expressed in crontab format. You can use this guide to format a custom time if you wish. You might want to start with running this jobs overnight (e.g. to run this at midnight UTC this custom time will be 0 0 * * *). For testing purposes your engineer can run these jobs manually whenever needed, and you can change this schedule whenever you want and have this recognized within minutes.
- In the “Output Settings” section, you can specify time periods for each table. Since a lot of databases include relationships to things like users and companies it is advisable to include all of these tables as to not break any relationships, but for data such as individual transactions made by users you can usually safely omit historic data within these tables. You can always return to this setting and make adjustments later. Note that these time periods can be based on creation times, update times, or both, and you’ll need to note which fields are used for recording these respective timestamps.
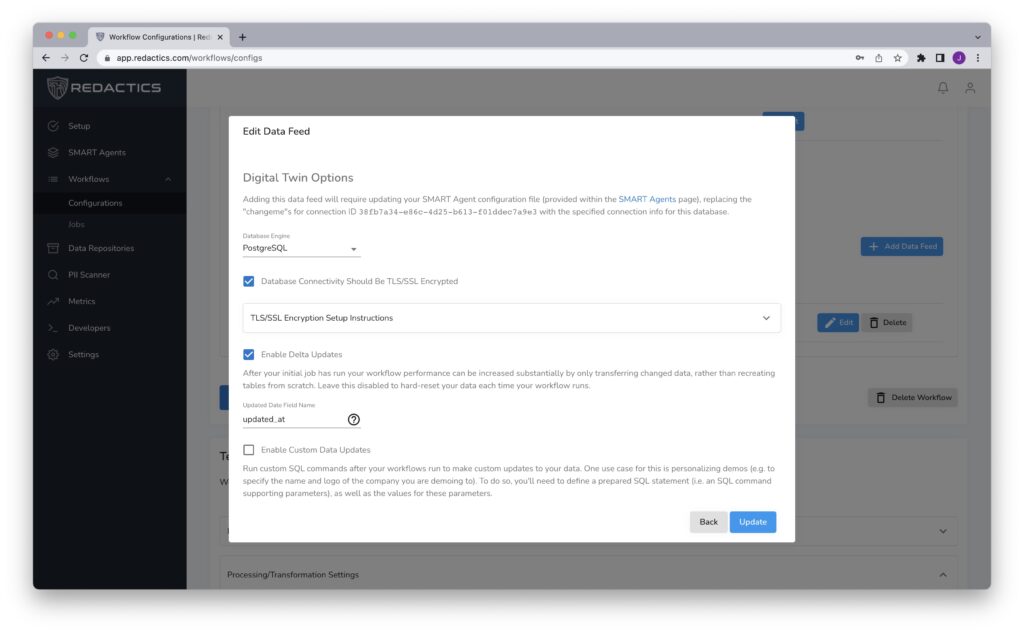
- Create your Digital Twin data feed by clicking on “Create a PII-free Digital Twin/Clone”. Check the “Database Connectivity Should Be TLS/SSL Encrypted” checkbox if this is a technical requirement (and follow the instructions for enabling this if so). If you wish to enable delta updates, click this checkbox, and specify which field is used for recording “updated at” timestamps. This is used by this feature for determining which rows have been updated and should therefore be included in the delta update (in addition to unique primary keys, which are considered new rows). Note that in your digital twin database a new column for each table will be automatically generated called
source_primary_key. This is used for recording the primary key of the original master record, so that you are free to add new data to your clone (which is common in a test environment) without having to worry about new data that comes in having conflicting primary keys with any data written to your database by something other than the Redactics SMART Agent. You may have a need for custom data updates (e.g. resetting email addresses for employees of your company so they can login to this environment with their existing email addresses). If so, follow the instructions here to apply these if you wish this automation. If you don’t, you can always update your data manually, and with the delta update feature enabled your overwritten data will be left alone. Note that if you disable delta updates, each time the workflow runs your data will be hard reset, so you probably want delta updates enabled. - Once you’ve created your Digital Twin data feed you will be provided with instructions for adding the connection info for this database to your SMART Agent configuration (which will require a one-time re-install to inject and save this information).
- Optional: if you wish to archive your created datasets to an Amazon S3 bucket, enable the “Push Data to your Internal Data Repository” data feed. This will upload versioned datasets to your bucket and report these to the “Data Repository” page of the dashboard where instructions for installing these datasets locally can be found. Since this bucket is in your own infrastructure, you can also enable access to this bucket for your CI/CD pipelines should you wish to download and install these datasets for your automated testing. If you have additional use cases for your CI/CD, please let us know which platform(s) you are using and we can arrange plugins to unlock additional useful integrations and features!
- Click “Update”, and then “Save Changes”.

Step 3: Running Your Workflow
Congratulations, your digital twin database will be populated with safe production data samples! You are ready to use this database for all of your testing needs, and your engineers can customize these workflows as needed without having to involve your DevOps team members. To ensure that you are good to go, you can either bump up your schedule or else have an engineer invoke the workflow manually via the Redactics SMART Agent CLI. Any issues with the workflow will be reported to the Redactics Dashboard, and, of course, you are welcome to contact Redactics Support if you require any assistance!
As workflows run, the progress will be reported to the Workflows -> Jobs page, and when this work has been completed a report will be provided detailing what was copied. If you’ve enabled the delta updates, on subsequent runs you’ll see visual feedback like the following:

Note that if the schema of these tables change, this will automatically detected and the table will be full copied for its next run instead. This way, the table’s schema will be applied in addition to any backfilled data.
Relating Data Back To Its Master
This is worth re-iterating: when you delta update a new column will be created called source_primary_key containing the primary key of the master record. If you need to search for specific records in your digital twin, you’ll need to adjust your queries to use this field instead. One reason for this design is to establish a single source of truth, with that truth being the master record in your production database. Whenever this master record is updated, this update will automatically be applied to your test data on its next run so long as the updated_at fields in these original tables have been updated.
Data Privacy By Design
You can provide access to your internal stakeholders (for analytics, business intelligence reporting, etc.) to your new digital twin (or create another one for them), and sever their access to your production database. It is usually rare that access to the sensitive information in a production database is required, but if this applies to you you can carve out exceptions (if any) with automated scripting to retrieve this information, replacing any direct database access which may have existed prior. By defaulting to using databases managed by Redactics, this establishes a new paradigm of safe data by default, your own “No PII Zone”, i.e. data privacy by design. This also ensures that you do not have to account for production data access in your compliance evidence collection as you would have otherwise.